This is a tutorial showing how i create SHP units.
It's probably not the best way but the result is still good.(i hope so :biggrin: )
\EDIT
This is a faster way that IcySon55 told me. For this you need
XCC_Utils_U.zip from CNCVK, who updated the original XCC Utilities. This is necessary because the original version has problems with the png file format, causing crashes.
To install it, just overwrite the original files with the one from vk.
Step Nr1: Create a 3dmodelLike described in the old method, but now render the frames in 24 bit PNG file format without Alpha Channel.

Also added is an example 3dsmax file showing some better camera settings:
 StreetLight.zip
 ( 26.61K )
Number of downloads: 507\EDIT Here is a zip with 5 3dsmax files showing different foundation sizes for buildings in the common TS shp sizes
(96x96pixel=2x2TScells,144x144=3x3,192x192=4x4,240x240=5x5,288x288=6x6):
LKOfoundations.zip ( 87.14K )
Number of downloads: 538The lights are now linked to the camera without bones. The only thing that turns is the camera itself.
Another hint: If you make Shadowframes use a Density of 1000. It creates shadows with the color 255,0,255 and after shp conversion it's very simple to change all shadows with shpbuilder to the shadowcolor #1. Step Nr2 becomes obsolete this way.
If you give the rendered frames already the correct filename in 3dsmax, the renaming step isn't necessary too. Just make sure that the image frames start with index 0 and the shadowframes follow them without a gap in the numeration with the same filename.
Current Result:
-many pictures in 24bit PNG-format representing the frames of the unitStep Nr2: convert the sequence with xcc-mixer into a shp unit.Open cncvk's updated xcc mixer and convert the sequence into an SHP(TS) file. Be sure that the sequence you convert is the only one in the directory, because vk's mixer still has some problems with multiple different named sequences.
Step Nr3: finishing work with shp-builderRight now all shadow frames use color #204. Go to the first shadow frame, choose the color selector, click on the shadow, press alt+a, choose for the "replace color" the shadow color with index #1.
If you rendered all frames with a green (rgb 0,255,0) background, you can also remove the same way very easy holes in the SHP caused by a wrong conversion of a black pixel into the black color#0 which is transparent ingame. Just replace every black (color #0) pixel with color#62 (But only on the image frames, not the shadow frames). Then convert the green background color to color #0. This way you'll never get holes and can make pure black unit-parts.
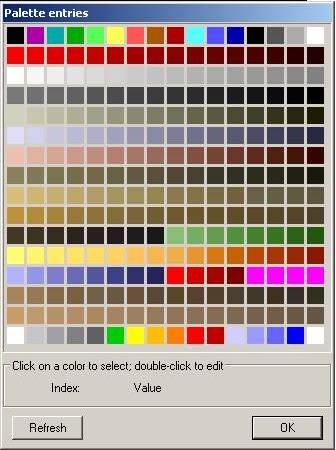
Look out
here for further information about the color palette.
\EDIT END
___________________________old method______________________________
First and most important you need 3dsmax since this is the program i use to create SHP units.
Then you need some extra picture editing programs. I use Corel Photopaint and IrfanView.
Irfanview is free, but not Photopaint. As an alternative for Photopaint you can use any program that can convert the color palette from a picture into a user defined one. And it should support a batch conversion because you have to do the palette conversion for more than 100 single pictures.
Step Nr1: Create a 3dmodelSince it needs quite some experience and 3dsmax is a very complex program i wont explain how to model in
3dsmax here.
But i offer you this way all my 3dsmax files i used to create my ATST.
ATSTmax.zip ( 279.02K )
Number of downloads: 503In the zip are 2 max files and all textures i use.
One max file with the unit textured in Nod colors (ATST_1walk) and one with the unit complete black (ATST_z1walkshad).
The first one ATST_1walk.max is for the unit itself and all the single frames (for walking and standing).
The second one ATST_z1walkshad.max is for the shadow of the unit. For this, the unit is black in a material
that doesn't allows shadows on it, and the ground is textured in a black material that allows shadows. The
light_source Omni01_Shadow has the Shadow Parameters for the purple shadows with a high Density. The result is, that only the shadows are visible.
The Camera and the light sources (one for the ambient light, one for the shadows), are connected with bones. Because it is easier to rotate the camera/lights around the unit, than the whole unit with his different animated bodyparts.
The atst_1walk which is used for the normal frames, includes all materials i use to create GDI units too.
And in the zip are all my textures i used for my units.
Once you have created the unit and animated it with bones, you can render it into the different frames from
the 8 directions. For turrets you have to rotate the camera in 32 steps (11,25° each) instead of 8 steps
(45°) around the centre.
If you have the unit rendered with both files, once with textures and once with the shadow frames the second
part begins.
Current Result:
-many pictures in 24bit BMP-format representing the frames of the unitStep Nr2: Adjust the color for the shadow frames (takes only about a minute, once you know how to do it)Because the rendered shadowframes purple color is too dark compared to the purple in the TS unittem palette (that is the shadow color for TS) i adjust the frames with Irfanview.
For this i take the batch conversion tool from Irfanview.
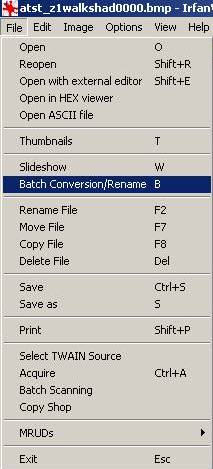
Add all shadowframes to the Input files:
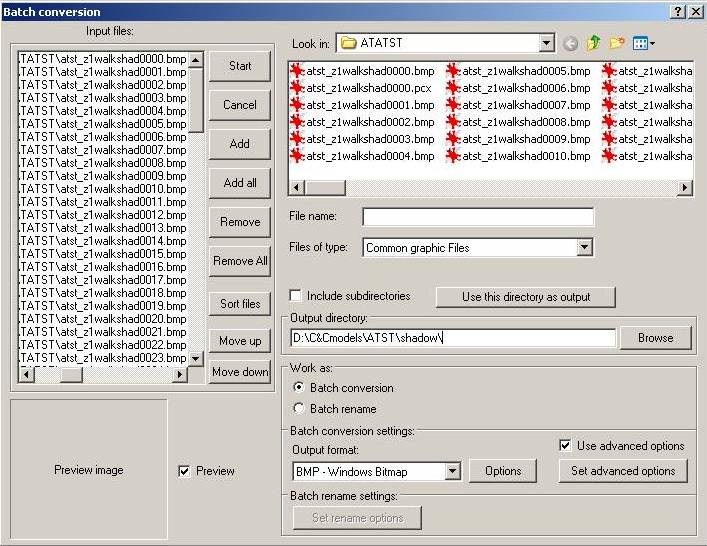
and start the Batch conversion with the settings defined under "Set advanced options".

First i raise the saturation of the frames to maximum. For this i repeat this batch conversion 3 or 4 times.
Then all frames have a pure purple color and the background a pure black.
Then i reload all frames again in the batch conversion and change the advanced options to reduce the
brightness about a value of -85 for all frames.
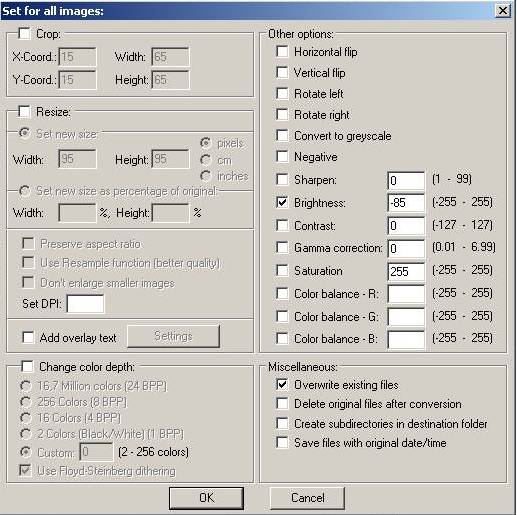
The result is, that all shadow frames have nearly the same color as the purple in the TS unittem palette and
the palette conversion from Corel Photopaint doesn't mix up the colors.
Render result from 3dsmax:

Saturation raised through 3-4 repeats

Brightness fixed to final result
 Current Result:
-many pictures in 24bit BMP-format representing the frames of the unit
-adjusted shadowframes purple-values to fit with the TS unittem shadow purpleStep Nr3: Palette Conversion for all frames (dependent on your cpu takes about 1-5 minutes)It is necessary to convert all frames into the same palette. Else XCC-mixer can't convert them into a single
shp unit and mixes up the colors of the unitframes.
For this i take Corel Photopaint.
This has a batch conversion and can load userdefined scripts that get used for the conversion.
I created a script using my modified unittem.pal to convert the palette of a picture. In this palette i
converted all red colors to green, except the remap red color. (palette included in the zip from above too "unitpalm.pal")
Else the palette conversion would mix them up and remap red becomes non-remap red and vice-versa.
Original:
Modified:

Now you can convert all single frames with the batch conversion into pcx format using the modified unittem
palette.
Current Result:
-many pictures in 8bit PCX-format representing the frames of the unit, using all the same modified unittem palette
Step Nr4: rename all frames to a single sequence (takes only 1-5 seconds dependant on your cpu)To convert the frames into a single shp unit you have to rename them into a single sequence with the
following syntax: UNITNAME XXXX.pcx while xxxx is a number counting up from 0000.
For that you can use Irfanview again.
Irfanview has in the batch conversion an option batch rename.
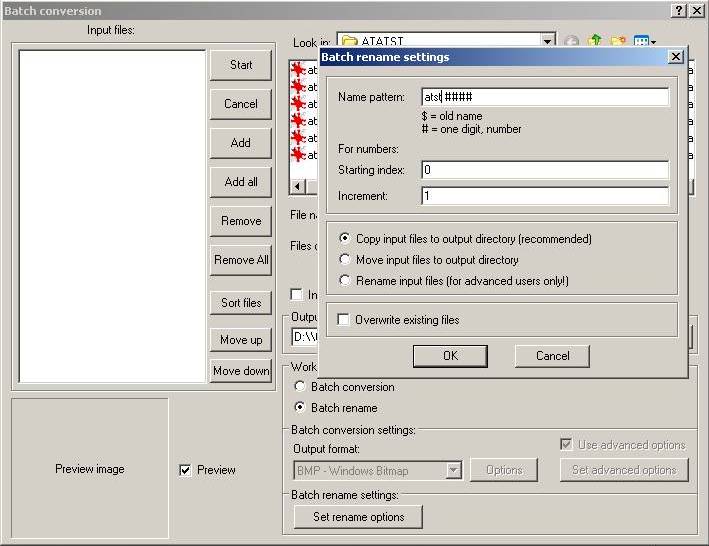
But now you have to watch out for the right order of the frames in the final sequence. Take a look on
original units with XCC mixer how those are ordered.
The most important to know is: first normal frames, then shadow frames. In the end you can still define where what kind of sequence starts and how long each one is in the art.ini.
Step Nr5: convert the sequence with xcc-mixer into a shp unit. There are already some tutorials how to do this so i wont explain it again.
But at least it's only a right click and a click on copy as SHP (TS). :biggrin:
Done, your unit is ready to use.
Step Nr6: modify some minor mistakes caused by the renderer sometimes some small details aren't rendered in an optimal way (like eyes from my redeemer aren't rendered at all or bigger than expected). Also it can happen that a very dark unit part gets converted into background black while palette conversion and causes holes in the unit. For this you can now use the SHP-Builder to fix the minor problems.
You can now create a cameo for the sidebar using your existing 3dmodel with a different camera perspective
and the standard TS iconbackground.
zip with blank backgrounds:
blankicons.zip ( 7.15K )
Number of downloads: 434I hope this helps and have fun creating SHP units
This post has been edited by Lin Kuei Ominae: Sep 12 2008, 09:44 AM
 Lin Kuei Ominae (***) how to create SHP units with 3dsmax Jan 5 2007, 09:49 PM


 Jan 5 2007, 09:49 PM